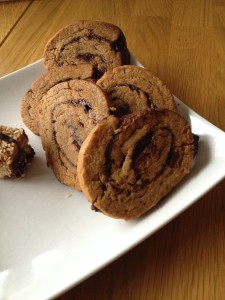
Peanut butter is my downfall. So delicious! So versatile! So nutritious (in small quantities)!
So of course I had to make these cute cookies!
They were actually a lot of work. They look so simple and taste so delicious, but they were the most effort of all of my recent baking exploits. Mostly because they needed so many cooling steps. But also because some of those steps really benefitted from 4 hands.
Would I make them again? Eh, probably not. You can get delicious peanut butter flavor for a fraction of the effort with Ovenly’s/Smitten Kitchen‘s Salted Peanut Butter cookies. But these look fancier.
Peanut Butter Chocolate Whirligigs
From Baked Elements
Yield: 25 to 30
Ingredients:
For the Peanut Butter Dough
2 1/4 cups (280 grams) all-purpose flour
3/4 teaspoon baking powder
1/2 teaspoon baking soda
1 teaspoon salt
6 ounces unsalted butter, cool but not cold
1 cup (230 grams) firmly packed dark brown sugar
1/2 cup (100 grams) granulated sugar
3 tablespoons vegetable oil (preferably canola)
3/4 cup smooth peanut butter (all-natural or not; if all-natural, just make sure it’s well mixed)
1 large egg, plus 1 large egg yolk
2 teaspoons pure vanilla extract
For the Chocolate Filling
12 ounces good-quality dark chocolate (60-72%), coarsely chopped
1/2 teaspoon light corn syrup
Directions:
Make the peanut butter dough
In a large bowl, whisk together the flour, baking powder, baking soda, and salt. Set aside.
In the bowl of a standing mixer fitted with the paddle attachment, beat the butter, sugars, oil, and peanut butter on medium-high speed until fluffy, about 5 minutes. Scrape down the sides and bottom of the bowl and add the egg, egg yolk, and vanilla, beating until incorporated.
Scrape down the sides and bottom of the bowl and add half of the flour mixture. Beat until just incorporated; do not overmix. Add the remaining flour mixture and beat until just incorporated.
Transfer the dough to a cool, lightly floured work surface and shape into a disk. Wrap the dough in parchment paper, then in plastic wrap, and refrigerate until the dough is firm, about 3 hours. (I wrapped it only in plastic wrap, but in about 5 layers of it.) The dough can be made a day ahead and refrigerated for up to 24 hours.
Flour a rolling pin. Line a work surface with a piece of parchment paper about 14 inches long, dust the parchment with a sprinkling of flour, divide the disk of dough in half, and roll out one half directly on the parchment into a rectangle about 9 1/2 inches long by 7 1/2 inches wide and just under 1/2 inch thick. If the dough is too thin, it will be extremely difficult to roll up. Transfer the dough, keeping it on the parchment, to the refrigerator to firm up. Repeat the rolling process for the second half of the disk and refrigerate.
Make the chocolate filling
While the dough is chilling, melt the chocolate and corn syrup in a microwave or double boiler. Whisk until smooth, then set aside to cool for a few minutes.
Assemble the roll
Remove one sheet of dough from the refrigerator. Dip a pastry brush in the chocolate and brush the top surface of the dough almost to the edge. (I actually poured half of the chocolate on the dough and then spread it with the back of a spoon.) Make sure the chocolate coverage is good and hearty, but leave a 1/2-inch strip with no chocolate on one of the long sides of the rectangle and double up on the chocolate on the opposite long side0 this will be the center of the cookie. Using the parchment paper to help you, slowly roll the dough into a log, starting from the long side of the rectangle that has double chocolate. (The paper should not be inside the log but used as a tool to help create the log.) This is the part that I needed an extra pair of hands for. Once the dough is rolled, keep it wrapped in the paper, then wrap tightly in plastic and refrigerate. Repeat this process with the second sheet of dough.
Chill the logs for at least 3 hours, or up to 24 hours, until the logs feel very solid; if they do not feel solid, they probably need to be refrigerated for a few hours longer.
Make the cookies
Preheat the oven to 350F. Line two baking sheets with parchment paper.
Unwrap the logs and place on a cutting surface. Dip a knife in very hot water and cut the log into individual cookies, 1/2 to 3/4 inch thick, and place on the prepared baking sheets. If they get a tiny bit disfigured in the cutting process, you can use your fingers to reshape the cookies slightly; if the chocolate breaks or spills out, you can gently push it back in place.
Bake for 11 to 13 minutes, rotating the baking sheets halfway through the baking time. Do not overbake these cookies – remove them from the oven the second they start to brown.
Place the baking sheets on wire racks to cool for 5 minutes. Then use a spatula to transfer the cookies to the racks to cool completely.
Whirligigs can be stored at room temperature, tightly covered, for up to 2 days.

